
|
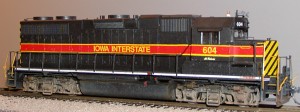 By Joe Atkinson Decorating an IAIS unit in the standard black/red/yellow scheme is really not difficult, but the red and yellow striping and large barricade stripe decals mean that you'll need to keep a good supply of decal solvent on hand. Basic painting is easy, with the hood ends painted in the Reefer Yellow of your choice (since Microscale’s barricade stripes are in black) and everything else on the body in black. For the black, I use Scalecoat 2 #2001, Loco Black. It's not "pure" black, but it's not heavily toned down either. For the yellow I’ve used Floquil Reefer Yellow since it’s what I had on hand, but I’ll probably look to Scalecoat 2 next time I buy more. The vast majority of the decals come from Microscale set 87-551, "IAIS Diesel - Hoods and Switchers" and Oddballs Decals 87-743, "IAIS Hood Units". Once the paint is dry, paint the step edges with Floquil Reefer Yellow. Apply the barricade stripes of your choice. (Obviously, the end grab irons should not have been applied yet.) Work from photos of the unit you're modeling, as the vertical positioning of the striping varies from unit to unit. This is even true among nearly identical units in the same class, such as GP38ACs 625-628. Take note of how high the upper chevron is in relation to the center of the hood end, as well as where the stripes fall in relation to the corners of the hood. If the decal pattern doesn't match the unit you're modeling, simply determine the correct upper boundary for the stripes and, before soaking, slice the decal horizontally at that point. That portion of the decal above the slice may then be used for the bottom of the hood end, effectively shifting the stripes upward, and everything lines up perfectly. Due to the large barricade stripes and relatively thick and wide body stripes, most every decal applied on an IAIS unit will require several treatments of Walther's Solvaset in order to settle down properly. On the rear of the unit, I found that it worked best to let the barricade stripes dry on their own first, carefully cutting away an opening for the headlight with a new X-Acto blade as they did so. Once they had dried, it was then an easy matter to slice away that portion of the stripes that covered the number board openings, always cutting with strokes *into* the opening so as not to tear any of the decal away from the body. Once that was complete, Solvaset was applied and allowed to dry. Any bubbles were then pierced and Solvaset reapplied until the decals fit snuggly over each detail. Once the barricade stripes are dry, the next step is to apply the red and yellow stripes to the long and short hood and cab. First to go on is that portion of the stripe that contains the words "Iowa Interstate" so that they can be correctly positioned on the body. Again, this positioning can vary from one unit to the next. According to my measurements, the bottom of these stripes should fall exactly 3' above the lowest portion of the walkway (i.e. that which is not elevated by the blower duct running underneath). This height causes the top of the stripe to be even with the bottom edge of the side cab windows. If this is your first IAIS unit, I'd suggest doing the engineer's side first so that you don't have the brake chain housing or blower bulge to worry about until you've had more practice. Once the stripes are positioned on the unit, carefully press down on them with a paper towel to remove any trapped bubbles. Again check your positioning, then apply Solvaset and set the locomotive aside, being sure not to leave the locomotive laying on its side as that can cause the Solvaset to pool and distort the decal. Also, I've found out the hard way that, if I attempt to continue working on a shell after I've applied Solvaset to some part of it, it's too easy to disturb the decal while the Solvaset is working. Once Solvaset is applied, the decal quickly becomes almost the consistency of paint, and is nearly impossible to reposition or remove if accidentally touched. Once the first portion of the stripe is in place on both sides, continue with the striping decals, simply extending the stripe in both directions until it terminates even with the barricade stripe on the hood ends. Note that, on at least some examples of the Microscale IAIS set, the upper and lower yellow stripes that border the red are of different widths. This isn't noticeable as long as you're consistent in always applying the thinner stripe on top, for example. Also, take care when going around the blower bulge and cab so that the decal remains perfectly horizontal on these irregular surfaces. Be sure that the decal settles down properly into the inside corners at these locations. Regarding the brake lever housing, I've found it best to handle it much like the rear number board openings: Apply the decal so that it spans the opening, but don't apply Solvaset yet. Once the decal has dried, carefully trim around the opening and reapply that portion of the decal to the inside of the housing. I then trimmed 2-3 small pieces of stripe decal to complete the stripe through the housing. Take note of the unit you're modeling, as some had the stripe applied up and over the brake lever itself, while on others it's only applied to the housing, with the brake lever being solid black. Once the stripe is in place along the length of the body, dab with paper towel, re-check your alignment, and apply Solvaset. Once it's dry, repeat the process described above to do away with any remaining air bubbles. Follow the same procedure for applying the sill stripes. If applicable, apply the yellow edge stripes along the walkway steps on either side of the cab. However, not all IAIS units have these stripes, so refer to your prototype. I chose not to use the decals for the step well step edges, preferring to paint these using Floquil Reefer Yellow. With the stripes in place, it's time to apply the locomotive numbers to the cab. This is also as good a time as any to do the number boards. The "Work Safely" decals for the step wells (applied to the frame on IAIS 303) come from the Oddballs set. This set also includes several decals unique to individual IAIS units: The elongated name and number font on 402 and 403, the Operation Lifesaver logos on 600 and 603, the bold font on 602, and the "Al Roberts" script on 604. With decals almost done, you can now apply the remainder of the details. I found it much easier to paint the end grab irons before application. On the IAIS, these end grabs can be solid yellow, solid black, or black with yellow ends, depending on the unit. Touch up the window frames and MU and air hose ends with Floquil Old Silver. I noticed that on many IAIS units, the outer- most hose end is orange, which I replicated with Floquil Reefer Orange. Paint the MU hose receptacle cap red, as well as the fuel filler caps. Reassemble the locomotive, but if it’s a GP38 or GP38AC and has an electrical cabinet air filter box (ECAFB), don't install the long hood handrail on the fireman's side. (The ECAFB is found on most IAIS GP38s, and all GP38ACs, GP38-2s, SD20s, and SD38-2s.) With the body in place on the walkway, now is the time to decal the ECAFB, already glued to the walkway behind the fireman's side of the cab. (Note that the IAIS 700-series GP38-2s were painted at Mid America Car in Kansas City with solid black ECAFBs. The first SD38-2 hasn’t been released in IAIS paint as of this writing, but it’s assumed that MAC will leave the ECAFB black on those as well.) Since the top of the ECAFB extends into the red/yellow stripe, the box itself has to be striped on the GP38s, GP38ACs, and SD20s as well. Apply the decal striping around the two visible sides, lining the ends up with the stripe on the long hood and cab. Check to be sure that it's horizontal all the way around, a task that can be a little tricky because of the overhanging lid on the box. Once it's in place, apply Solvaset, and the decal should settle right down around the surrounding details. Once it's dry, cut a small bit of red striping for the ECAFB lid, allowing a small opening for the handle to fit through. Apply the decal, and when the Solvaset is dry, touch up the handle with Floquil Signal Red. Apply any remaining handrails. Paint the vertical portions near the step wells, as well as the coupler cut bars, with Floquil Reefer Yellow. Weather the unit to suit your taste, seal with a coat of Testor's Dullcote, and you've got another nice looking workhorse for your IAIS stable. |
|||||||||||||||||||||||||||||||||||||||||||||||||||
 All images on this site are copyrighted by their respective creators, and used with permission. All images on this site are copyrighted by their respective creators, and used with permission.All Iowa Interstate logos and trademarks are property of Iowa Interstate Railroad, Ltd. and Railroad Development Corporation. Questions? Comments? Please email us at contact@iaisrailfans.org |
Last modified on November 21, 2010, at 06:55 PM Edit Page | Page History |